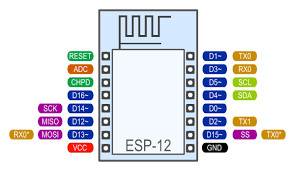
This is a guide to setting up your new ESP8266 (In this tutorial we use an ESP-12E). There are three main phases to this process.
- Getting the right parts
- Setting up your Arduino environment
- Wiring up your ESP and flashing
Getting the right parts
There are other thing you might need, such as a power supply, wires, breadboard, etc … but we wont cover those here.
Setting up your Arduino Environment
Here we want to setup the Arduino IDE with the latest hooks for the ESP8266. This code repo will allow you to easily interface with the ESP as if it were an arduino board.
- Install basic Arduino IDE (here)
- Go to Arduino directory (usually found in My Documents)
- Clone this repository into hardware/esp8266com/esp8266 directory (or clone it elsewhere and create a symlink)
- Download binary tools (you need Python 2.7)
- Run “Python get.py” found in esp8266/tools
- Restart Arduino program
Wiring up your ESP and flashing
Using the images above, wire the TTL programmer to the ESP-12E. Note that some TTL programmers, including the one linked, will not be able to supply adequate power for the ESP, so an external 3.3V power supply may need to be used (in which case you would not use VCC from the programmer).
When you want to flash the board, you must first hold GPIO0 to GND while you simultaneously touch REST to GND. This will reset the ESP and put it into firmware update mode. It must be in this mode to program. Upon programming., it will come out of programming mode by itself, so you will need to repeat these steps for every program attempt.

